Frames are great tools within Canva to create eye-catching designs. Whether you’re creating a poster, an invitation, magazine cover or any other kind of design, frames can help you make your work stand out. This guide will teach you all the tips and tricks for using frames in Canva – from adding pre-made ones to creating custom shapes and sizes.
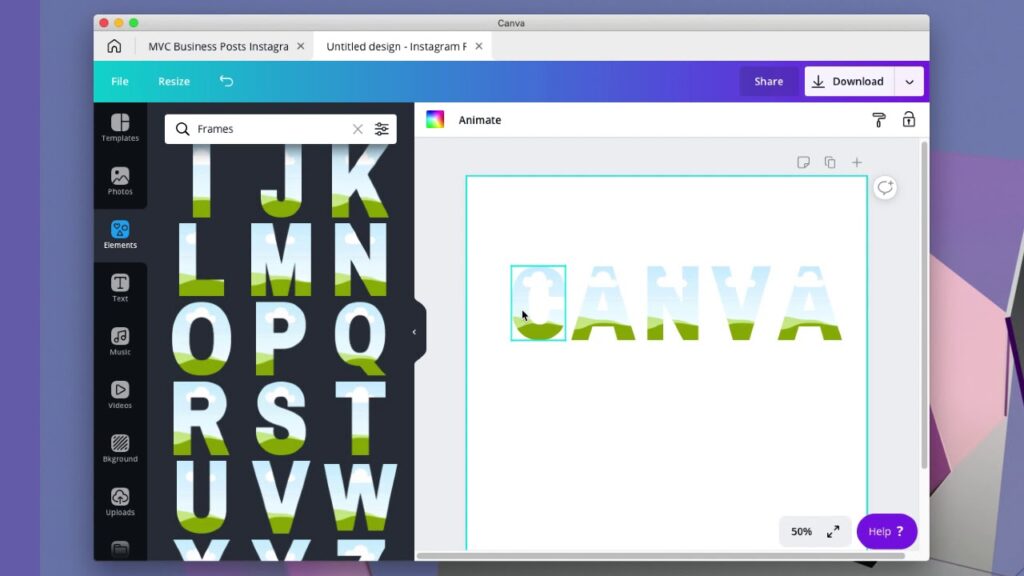
First up is knowing how to select and add pre-made frames to your design. Canva offers a wide selection of professionally designed frames that can be added to any project with ease; just go to the Frames tab at the top of your Canva workspace and choose from several different categories including Borders, Edges & Corners, Drawings & Icons, etc. When you find a frame that works for your project, simply drag and drop it onto your canvas or click on the plus icon beside it. You can customize its size and color or apply effects like shadows or outline – perfect for giving your work that extra professional edge!
Another great way to use frames in Canva is by making custom shapes – giving you complete control over exactly how they’ll look in relation to your other elements. All you have to do is click on the Custom Shape tool at the top right side of the builder app (hovering over Shapes) then select the shape that you want from the three options:
- Rectangle
- Star
- Circle
Just like with pre-made designs, this will allow you complete control over size, color and effects so that everything looks just right when completed!
Finally, we’ll cover how frames can be used as backgrounds for your text elements. By selecting a frame from one of Canva’s library and using it as a background behind some text (by also selecting “transparent” as an effect), it adds an extra unique touch that really helps make all of your work stand out!
How to Use Frames in Canva
Frames are an essential element in design, making it easier to organize elements in your visual composition. Frames are an easy and powerful way to create borders around elements or group them together in Canva.
In this article, we’ll cover the basics of using frames in Canva, and provide some tips and tricks to get the most out of this design feature:
- Using frames to create borders around elements
- Using frames to group elements together
- Tips and tricks for maximizing the use of frames
Select a Frame
Creating visuals with Canva’s frames can make your images stand out. With a few simple steps, you can use frames to customize and refine your designs. Here are some tips for using frames in Canva:
- Select the frame you want to use for your design. Choose from a variety of geometric shapes, patterns, or images that represent your brand and reflect the style of the image you’re working on.
- Once you select your frame, customize it to match the look and feel of your design by changing its opacity, color, and size.
- You can also layer multiple frames together to create a complex collage or montage effect for more visually interesting outcomes.
- If necessary, drag, rotate or flip frame elements on top of other elements by selecting an element and using the rotation handles on its corners if needed!
Adjust the Size and Position of the Frame
Frames are a great way to add a subtle accent to your design projects in Canva. They can be used as borders around images and text, or as creative elements that add depth and character to the overall design. To make sure your frame serves its purpose perfectly, it’s important to know how to adjust the size and position of the frame.
When adding a frame to an image or visual element in Canva, you can adjust the size in two ways: by dragging the edges of the frame outward or inward, or by entering an exact value for width and height using the Fields feature. Once you’ve selected a frame and have adjusted its size as desired, you can also use your mouse or trackpad to drag and move it into place.
You can also rotate frames with ease – simply select your frame and adjust its rotation with the clockwise/counterclockwise buttons; enter an exact degree of rotation in the “Rotate” field; hold down Shift + Option/Alt (Mac) or Shift + Ctrl (Windows & Chromebook) then click & drag around an angle on top of your elements – this will automatically airbrush it into position!
- So whether you want a perfect rectangle shape or just want that perfect symmetrical image, you can achieve what you need with frames via customization tools in Canva:
- Dragging the edges of the frame outward or inward
- Entering an exact value for width and height using the Fields feature
- Dragging and moving the frame into place
- Adjusting the rotation with the clockwise/counterclockwise buttons
- Entering an exact degree of rotation in the “Rotate” field
- Holding down Shift + Option/Alt (Mac) or Shift + Ctrl (Windows & Chromebook) then click & drag around an angle on top of your elements
Add Text to the Frame
When creating designs in Canva, frames can be used to add dimension, interest and highlight important images or text. Aside from adding background colors, shapes or accents, another way to make your frame really pop with creativity is by adding text inside your design.
Using the Text tool in Canva allows you to customize your designs and create typographic works of art! Start by adding a frame shape from the Elements tab in Canva and then click the text box that appears inside of it. You can then customize your font by choosing from hundreds of fonts and colors for any occasion.
You may also upload an image such as a logo or monogram before writing the text in order to make it more unique and eye-catching when seen on a web page or printed material. To achieve this look easily:
- Go to Uploads > Upload an Image > Add to Library
- Select either one or multiple images that will appear on top of your text box
Once uploaded resize and adjust the layout of them until you reach an ideal fit for your design needs. After that keep adding as many elements you like and switch between different font sizes until you reach the desired outcome for a personalized frame design no one else has!
Change the Color of the Frame
Canva makes it easy to customize the appearance of your frames and add unique visuals to your designs. A simple way to get creative with frames is to change the color of them. When you select a frame, you can edit it by clicking on the “Edit” icon at the top right of its pane. You will then have access to editing options that allow you to adjust various characteristics such as brightness and contrast, opacity, color tint and saturation. If you want just a plain solid-colored frame, click on the Color tab towards the top left of the screen and select any hue you like from the palette.
- Brightness and contrast
- Opacity
- Color tint and saturation
When complete, simply click ‘Done’ or ‘Save’ at the bottom right of your screen.
Tips and Tricks
Using frames in Canva can be an effective way to add some extra impact to your designs. Whether you’re creating a poster, a flyer, or an invitation card, frames can take your design to the next level. In this guide, we’ll show you some tips and tricks for how to use frames in Canva to help make your designs look more professional and eye-catching.
- Choose the right frame – select a frame that complements the overall design and brings out the best in your message.
- Experiment with different styles – try different frame styles and shapes, such as rounded corners or distressed frames, to give your design a unique look.
- Layer frames – layer multiple frames to create a more complex and interesting look.
- Use frames to highlight important text – add a frame around important words or phrases to draw attention to them.
With these tips, you’ll be able to use frames in Canva to create amazing designs that stand out and make a lasting impression.
Use the Alignment Tool
When using frames in Canva, one of the most useful tools for keeping elements neat and orderly on your design is the alignment tool. This tool lets you align frames, images, text and other elements quickly and easily.
To get started with the alignment tool, select a frame or other element. Then select either the circle with four arrows (which will align an item to the page) or the circle with crossed arrows (which will align multiple items relative to each other). The circle allows you to choose from nine different alignment settings:
- Top
- Center
- Bottom
- Left
- Middle
- Right
- Distribute Horizontally
- Distribute Vertically
- Make All Elements Equal Widths or Heights
You can also rotate items around a central point. Using these settings makes it easy to keep space between design items uniform and even throughout your project.
In addition to this basic alignment toolset, Canva also offers adaptive sizing options—you can opt to make sure two objects have equal size as they’re moved around on the canvas. This ensures that everything fits together neatly with minimal manual effort required on your part!
Create a Custom Frame
Creating a custom frame within Canva can be extremely useful when creating a graphic that requires a specific shape or look. To create your own frame, first click on the “Custom” tab located towards the top right of the application.
Once you’ve clicked on this tab, another window will open which will allow you to construct your own frame. You can choose from either circles, squares or polygons, inputting both color and thickness of the outline into the given fields. Then use move and/or reshape tools found in this same window to adjust size and position of your new custom frames however you like.
Using these methods, you can create very unique looking frames perfectly tailored to fit the size and look of your overall design. This has great uses for logos, photos or text – so don’t be afraid to get creative! Remember that you always have access to undo/redo buttons at any level so if ever in doubt – give it a try!
Layer Frames
Using frames in Canva is a great way to make a design stand out and add a unique touch. If you’re looking for creative ways to liven up your Canva designs, frames are the perfect way to do this. Here are some tips and tricks for incorporating frames into your Canva designs:
- Layer Frames – One way to make a design more interesting is to layer different types of frames on top of each other. For example, you could use an irregular frame as the base layer, then add on rectangles or ovals as the second layer. This will create visual interest and texture in your design.
- Color Coordination – If you’re using multiple layers of frames, think about which colors will work best together. Consider how these colors will look when layered together and if the hues complement one another in the design. You can even choose different shades of gray or black to create contrast without overwhelming the eye with too much color.
- Rotation & Scale – If you want to create an interesting effect with your frames, play around with rotating them at different angles or scaling them up or down. This can be done within Canva’s editing tools by dragging the frame icon onto your design, then manipulating it until it meets your desired outcome. Just be sure not to go overboard – keep it balanced!
By following these tips and tricks, you can use layers of frames creatively in your Canva designs for added depth and interest!
Use Frames to Create a Collage
Frames are a great way to create beautiful collages. You can use frames to create a picture wall of your favorite photos, create scrapbook-style pages that highlight special memories, or add interest to logos and posters.
Canva offers frames in different sizes and shapes that are designed to work together perfectly. When you add a frame, Canva will automatically resize it to fit within the canvas to ensure no elements of your design are cropped out. You can also override Canva’s auto resize and use one of the preset ratios provided in the customization menu.
To help you get started on creating stunning collages with frames, here are some tips and tricks:
- Start with a frame base – Set up your frame base first by adding frames into an existing design or starting from scratch using a background color or texture.
- Try out different layouts – Experiment with different layouts for your collage. Try clustering small photo frames around one larger center frame for an art gallery feel or line up several large frames side by side for an eye-catching display.
- Add negative space – Don’t forget about negative space! Include breathing room between the individual photo frames for balance and harmony in the overall design.
- Rearrange until you find what works – Don’t be afraid to keep rearranging elements until you find something that looks right. Have fun playing around so you discover unexpected results!
Conclusion
In conclusion, frames in Canva are a great way to give your designs a finished look. With a few clicks of the mouse, you can add an elegant or fun element to your creation, depending on the style you choose. When it comes to frames and borders, there are many different styles and colors to choose from and all are easily accessible within Canva.
So no matter what kind of frame you’re looking for, you’re sure to find something that will make your design stand out. With a little bit of creativity and experimentation, using frames on Canva can be an easy and fun way to take your design projects up a notch!
- Elegant frames
- Fun frames
- Many different styles and colors
- Creativity and experimentation
More Stories
FutureTechGirls.com: 7 Kickass Tips To Level Up Your Tech Career In 2026
FutureTechGirls: 7 Kickass Tips To Launch Your Tech Journey In 2026
Kickass Tips For FutureTechGirls: Launch Your Tech Journey In 2026